OCS Inventory NG 2.5 | Ubuntu Server 18.04
OCS Inventory NG 2.5 en Ubuntu Server 18.04
El objetivo de este tutorial es ver cómo instalar y configurar nuestro servidor OCS Inventory. También veremos cómo instalar el agente OCS en Windows y ver el reporte que hace en nuestro servidor.
¡Empezamos!
1
2
3
4
5
6
7
8
9
10
11
12
13
14
15
16
17
18
19
20
21
22
23
24
25
26
27
28
29
30
31
32
33
34
35
36
37
38
39
40
41
42
43
44
45
46
47
48
49
50
51
52
53
54
55
56
57
58
59
60
61
62
63
64
|
Securing
the MySQL server deployment.
Connecting
to MySQL using a blank password.
VALIDATE
PASSWORD PLUGIN can be used to test passwords
and
improve security. It checks the strength of password
and
allows the users to set only those passwords which are
secure
enough. Would you like to setup VALIDATE PASSWORD plugin?
Press
y|Y for Yes, any other key for No: y
There
are three levels of password validation policy:
LOW Length
>= 8
MEDIUM
Length >= 8, numeric, mixed case, and special characters
STRONG
Length >= 8, numeric, mixed case, special characters and
dictionary file
Please
enter 0 = LOW, 1 = MEDIUM and 2 = STRONG: 0
Please
set the password for root here.
New
password:
Re-enter
new password:
Estimated
strength of the password: 50
Do you wish
to continue with the password provided?(Press y|Y for Yes, any other key for
No) : y
By
default, a MySQL installation has an anonymous user,
allowing
anyone to log into MySQL without having to have
a user account
created for them. This is intended only for
testing,
and to make the installation go a bit smoother.
You
should remove them before moving into a production
environment.
Remove
anonymous users? (Press y|Y for Yes, any other key for No) : y
Success.
Normally,
root should only be allowed to connect from
'localhost'.
This ensures that someone cannot guess at
the
root password from the network.
Disallow
root login remotely? (Press y|Y for Yes, any other key for No) : n
... skipping.
By default,
MySQL comes with a database named 'test' that
anyone
can access. This is also intended only for testing,
and
should be removed before moving into a production
environment.
Remove
test database and access to it? (Press y|Y for Yes, any other key for No) : y
- Dropping test database...
Success.
- Removing privileges on test database...
Success.
Reloading
the privilege tables will ensure that all changes
made so
far will take effect immediately.
Reload
privilege tables now? (Press y|Y for Yes, any other key for No) : y
Success.
All done!
|
1
2
3
|
CREATE
DATABASE ocsweb
DEFAULT
CHARACTER SET utf8
DEFAULT
COLLATE utf8_general_ci;
|
1
2
3
4
5
6
7
8
9
10
11
12
13
14
15
16
17
18
19
20
21
22
23
24
25
26
27
28
29
30
31
32
33
34
35
36
37
38
39
40
41
42
43
44
45
46
47
48
49
50
51
52
53
54
55
56
57
58
59
60
61
62
63
64
65
66
67
68
69
70
71
72
73
74
75
76
77
78
79
80
81
82
83
84
85
86
87
88
89
90
91
92
93
94
95
96
97
98
99
100
101
102
103
104
105
106
107
108
109
110
111
112
113
114
115
116
117
118
119
120
121
122
123
124
125
126
127
128
129
130
131
132
133
134
135
136
137
138
139
140
141
142
143
144
145
146
147
148
149
150
151
152
153
154
155
156
157
158
159
160
161
162
163
164
165
166
167
168
169
170
171
172
173
174
175
176
177
178
179
180
181
182
183
184
185
186
187
188
189
190
191
192
193
194
195
196
197
198
199
200
201
202
203
204
205
206
207
208
209
210
211
212
213
214
215
216
217
218
219
220
221
222
223
224
225
226
227
228
229
230
231
232
233
234
235
236
237
238
239
240
241
242
243
244
245
246
247
248
249
250
251
252
253
254
255
256
257
258
259
260
261
262
263
264
265
266
267
268
269
270
271
272
273
274
275
276
277
278
279
280
281
282
283
284
285
286
287
288
289
290
291
292
293
294
295
296
297
298
299
300
301
302
303
304
305
306
307
308
309
310
311
312
313
314
315
316
317
318
319
320
321
322
323
324
325
326
327
328
329
330
331
332
333
334
335
336
337
338
339
340
341
342
343
344
345
346
347
348
349
350
351
|
+----------------------------------------------------------+
| |
| Welcome
to OCS Inventory NG Management server setup ! |
| |
+----------------------------------------------------------+
Trying
to determine which OS or Linux distribution you use
+----------------------------------------------------------+
|
Checking for Apache web server binaries
!
|
+----------------------------------------------------------+
CAUTION:
If upgrading Communication server from OCS Inventory NG 1.0 RC2 and
previous,
please remove any Apache configuration for Communication Server!
Do you
wish to continue ([y]/n)?y
Assuming
Communication server 1.0 RC2 or previous is not installed
on this computer.
Starting
OCS Inventory NG Management server setup from folder /tmp/OCSNG_UNIX_SERVER_2.5
Storing
log in file /tmp/OCSNG_UNIX_SERVER_2.5/ocs_server_setup.log
+----------------------------------------------------------+
|
Checking for database server
properties... |
+----------------------------------------------------------+
Your
MySQL client seems to be part of MySQL version 5.7.
Your
computer seems to be running MySQL 4.1 or higher, good ;-)
Which
host is running database server [localhost] ?
OK,
database server is running on host localhost ;-)
On
which port is running database server [3306] ?
OK,
database server is running on port 3306 ;-)
+----------------------------------------------------------+
|
Checking for Apache web server
daemon... |
+----------------------------------------------------------+
Where
is Apache daemon binary [/usr/sbin/apache2ctl] ?
OK,
using Apache daemon /usr/sbin/apache2ctl ;-)
+----------------------------------------------------------+
|
Checking for Apache main configuration
file... |
+----------------------------------------------------------+
Where
is Apache main configuration file [/etc/apache2/apache2.conf] ?
OK,
using Apache main configuration file /etc/apache2/apache2.conf ;-)
+----------------------------------------------------------+
|
Checking for Apache user account... |
+----------------------------------------------------------+
Which
user account is running Apache web server [www-data] ?
OK,
Apache is running under user account www-data ;-)
+----------------------------------------------------------+
| Checking for Apache group... |
+----------------------------------------------------------+
Which
user group is running Apache web server [www-data] ?
OK,
Apache is running under users group www-data ;-)
+----------------------------------------------------------+
|
Checking for Apache Include configuration directory... |
+----------------------------------------------------------+
Setup
found Apache Include configuration directory in
/etc/apache2/conf-available.
Setup
will put OCS Inventory NG Apache configuration in this directory.
Where
is Apache Include configuration directory [/etc/apache2/conf-available] ?
OK,
Apache Include configuration directory /etc/apache2/conf-available found ;-)
+----------------------------------------------------------+
|
Checking for PERL
Interpreter... |
+----------------------------------------------------------+
Found
PERL interpreter at </usr/bin/perl> ;-)
Where
is PERL interpreter binary [/usr/bin/perl] ?
OK,
using PERL interpreter /usr/bin/perl ;-)
Do you
wish to setup Communication server on this computer ([y]/n)?
+----------------------------------------------------------+
|
Checking for Make
utility...
|
+----------------------------------------------------------+
OK,
Make utility found at </usr/bin/make> ;-)
+----------------------------------------------------------+
| Checking
for Apache mod_perl version...
|
+----------------------------------------------------------+
Checking
for Apache mod_perl version 1.99_22 or higher
Found
that mod_perl version 1.99_22 or higher is available.
OK,
Apache is using mod_perl version 1.99_22 or higher ;-)
+----------------------------------------------------------+
| Checking
for Communication server log directory... |
+----------------------------------------------------------+
Communication
server can create detailed logs. This logs can be enabled
by
setting integer value of LOGLEVEL to 1 in Administration console
menu Configuration.
Where
to put Communication server log directory [/var/log/ocsinventory-server] ?
OK,
Communication server will put logs into directory /var/log/ocsinventory-server
;-)
+----------------------------------------------------------------------------+
| Checking
for Communication server plugins configuration
directory... |
+----------------------------------------------------------------------------+
Communication
server need a directory for plugins configuration files.
Where
to put Communication server plugins configuration files
[/etc/ocsinventory-server/plugins] ?
OK,
Communication server will put plugins configuration files into directory
/etc/ocsinventory-server/plugins ;-)
+-------------------------------------------------------------------+
|
Checking for Communication server plugins perl
directory... |
+-------------------------------------------------------------------+
Communication
server need a directory for plugins Perl modules files.
Where
to put Communication server plugins Perl modules files
[/etc/ocsinventory-server/perl] ?
OK,
Communication server will put plugins Perl modules files into directory
/etc/ocsinventory-server/perl ;-)
+----------------------------------------------------------+
|
Checking for required Perl
Modules...
|
+----------------------------------------------------------+
Checking
for DBI PERL module...
Found
that PERL module DBI is available.
Checking
for Apache::DBI PERL module...
Found
that PERL module Apache::DBI is available.
Checking
for DBD::mysql PERL module...
Found
that PERL module DBD::mysql is available.
Checking
for Compress::Zlib PERL module...
Found
that PERL module Compress::Zlib is available.
Checking
for XML::Simple PERL module...
Found
that PERL module XML::Simple is available.
Checking
for Net::IP PERL module...
Found
that PERL module Net::IP is available.
Checking
for SOAP::Lite Perl module...
Found
that PERL module SOAP::Lite is available.
Checking
for Archive::Zip Perl module...
Found
that PERL module Archive::Zip is available.
+----------------------------------------------------------+
|
Checking for optional Perl Modules... |
+----------------------------------------------------------+
Checking
for Apache2::SOAP PERL module...
***
Warning: PERL module Apache2::SOAP is not installed !
This
module is only required by OCS Inventory NG SOAP Web Service.
Do you
wish to continue ([y]/n] ?
Checking
for XML::Entities PERL module...
Found
that PERL module XML::Entities is available.
Do you
wish to setup Rest API server on this computer ([y]/n)?
+----------------------------------------------------------+
|
Checking for REST API Dependencies
...
|
+----------------------------------------------------------+
Found
that PERL module Mojolicious::Lite is available.
Found that
PERL module Switch is available.
Found
that PERL module Plack::Handler is available.
+----------------------------------------------------------+
|
Configuring REST API Server files
... |
+----------------------------------------------------------+
Where
do you want the API code to be store [/usr/local/share/perl/5.26.1] ?
Copying
files to /usr/local/share/perl/5.26.1
+----------------------------------------------------------+
|
Configuring REST API Server configuration files
... |
+----------------------------------------------------------+
+----------------------------------------------------------+
|
OK, looks good
;-)
|
| |
|
Configuring Communication server Perl modules... |
+----------------------------------------------------------+
Checking
if your kit is complete...
Looks
good
Generating
a Unix-style Makefile
Writing
Makefile for Apache::Ocsinventory
Writing
MYMETA.yml and MYMETA.json
+----------------------------------------------------------+
|
OK, looks good
;-)
|
| |
| Preparing
Communication server Perl modules... |
+----------------------------------------------------------+
+----------------------------------------------------------+
|
OK, prepare finshed
;-) |
| |
|
Installing Communication server Perl modules... |
+----------------------------------------------------------+
+----------------------------------------------------------+
| OK,
Communication server Perl modules install finished;-)|
| |
|
Creating Communication server log
directory... |
+----------------------------------------------------------+
Creating
Communication server log directory /var/log/ocsinventory-server.
Fixing
Communication server log directory files permissions.
Configuring
logrotate for Communication server.
Removing
old communication server logrotate file /etc/logrotate.d/ocsinventory-NG
Writing
communication server logrotate to file /etc/logrotate.d/ocsinventory-server
+----------------------------------------------------------------------+
| OK,
Communication server log directory created
;-) |
| |
|
Creating Communication server plugins configuration directory... |
+----------------------------------------------------------------------+
Creating
Communication server plugins configuration directory
/etc/ocsinventory-server/plugins.
+----------------------------------------------------------------------+
| OK,
Communication server plugins configuration directory created ;-) |
| |
| Creating
Communication server plugins Perl
directory... |
+----------------------------------------------------------------------+
Creating
Communication server plugins Perl directory /etc/ocsinventory-server/perl.
+----------------------------------------------------------------------+
|
OK, Communication server plugins Perl directory created ;-) |
| |
|
Now configuring Apache web
server...
|
+----------------------------------------------------------------------+
To
ensure Apache loads mod_perl before OCS Inventory NG Communication Server,
Setup
can name Communication Server Apache configuration file
'z-ocsinventory-server.conf'
instead of 'ocsinventory-server.conf'.
Do you
allow Setup renaming Communication Server Apache configuration file
to
'z-ocsinventory-server.conf' ([y]/n) ?
OK,
using 'z-ocsinventory-server.conf' as Communication Server Apache
configuration file
Removing
old communication server configuration to file
/etc/apache2/conf-available/ocsinventory.conf
Writing
communication server configuration to file
/etc/apache2/conf-available/z-ocsinventory-server.conf
+----------------------------------------------------------------------+
|
OK, Communication server setup successfully finished
;-) |
| |
|
Please, review /etc/apache2/conf-available/z-ocsinventory-server.conf |
|
to ensure all is good. Then restart Apache
daemon. |
+----------------------------------------------------------------------+
Do you
wish to setup Administration Server (Web Administration Console)
on this
computer ([y]/n)?
+----------------------------------------------------------+
| Checking
for Administration Server directories... |
+----------------------------------------------------------+
CAUTION:
Setup now install files in accordance with Filesystem Hierarchy
Standard.
So, no file is installed under Apache root document directory
(Refer
to Apache configuration files to locate it).
If
you're upgrading from OCS Inventory NG Server 1.01 and previous, YOU
MUST
REMOVE (or move) directories 'ocsreports' and 'download' from Apache
root
document directory.
If you
choose to move directory, YOU MUST MOVE 'download' directory to
Administration
Server writable/cache directory (by default
/var/lib/ocsinventory-reports),
especially if you use deployment feature.
Do you
wish to continue ([y]/n)?
Assuming
directories 'ocsreports' and 'download' removed from
Apache
root document directory.
Where
to copy Administration Server static files for PHP Web Console
[/usr/share/ocsinventory-reports]
?
OK,
using directory /usr/share/ocsinventory-reports to install static files ;-)
Where
to create writable/cache directories for deployment packages,
administration
console logs, IPDiscover and SNMP [/var/lib/ocsinventory-reports] ?
OK,
writable/cache directory is /var/lib/ocsinventory-reports ;-)
+----------------------------------------------------------+
|
Checking for required Perl
Modules... |
+----------------------------------------------------------+
Checking
for DBI PERL module...
Found
that PERL module DBI is available.
Checking
for DBD::mysql PERL module...
Found
that PERL module DBD::mysql is available.
Checking
for XML::Simple PERL module...
Found
that PERL module XML::Simple is available.
Checking
for Net::IP PERL module...
Found
that PERL module Net::IP is available.
+----------------------------------------------------------+
| Installing
files for Administration server... |
+----------------------------------------------------------+
Creating
PHP directory /usr/share/ocsinventory-reports/ocsreports.
Copying
PHP files to /usr/share/ocsinventory-reports/ocsreports.
Fixing
permissions on directory /usr/share/ocsinventory-reports/ocsreports.
Creating
database configuration file
/usr/share/ocsinventory-reports/ocsreports/dbconfig.inc.php.
Creating
IPDiscover directory /var/lib/ocsinventory-reports/ipd.
Fixing
permissions on directory /var/lib/ocsinventory-reports/ipd.
Creating
packages directory /var/lib/ocsinventory-reports/download.
Fixing
permissions on directory /var/lib/ocsinventory-reports/download.
Creating
snmp mibs directory /var/lib/ocsinventory-reports/snmp.
Fixing
permissions on directory /var/lib/ocsinventory-reports/snmp.
Creating
Administration server log files directory /var/lib/ocsinventory-reports/logs.
Fixing
permissions on directory /var/lib/ocsinventory-reports/logs.
Creating
Administration server scripts log files directory
/var/lib/ocsinventory-reports/scripts.
Fixing
permissions on directory /var/lib/ocsinventory-reports/scripts.
Configuring
IPDISCOVER-UTIL Perl script.
Installing
IPDISCOVER-UTIL Perl script.
Fixing
permissions on IPDISCOVER-UTIL Perl script.
Writing
Administration server configuration to file
/etc/apache2/conf-available/ocsinventory-reports.conf
+----------------------------------------------------------------------+
| OK,
Administration server installation finished
;-) |
| |
|
Please, review /etc/apache2/conf-available/ocsinventory-reports.conf
| to
ensure all is good and restart Apache
daemon. |
| |
| Then, point your browser to
http://server//ocsreports
| to
configure database server and create/update
schema. |
+----------------------------------------------------------------------+
Setup
has created a log file /tmp/OCSNG_UNIX_SERVER_2.5/ocs_server_setup.log.
Please, save this file.
If you
encounter error while running OCS Inventory NG Management server,
we can
ask you to show us his content !
DON'T
FORGET TO RESTART APACHE DAEMON !
Enjoy OCS Inventory NG ;-)
|
1
2
3
4
5
6
7
8
9
10
11
12
13
14
15
16
17
18
19
20
21
22
23
24
25
26
27
28
29
30
31
32
33
34
35
36
37
38
39
40
|
#
Uncomment following to force use of HTTPS in Administration Server
#SSLRequireSSL
#
PHP tuning (not working on all distribution, use php.ini instead)
AddType
application/x-httpd-php .php
php_flag
file_uploads on
#
Some PHP tuning for deployment feature up to 8 MB
#
post_max_size must be greater than upload_max_filesize
#
because of HTTP headers
php_value
post_max_size 200m
php_value
upload_max_filesize 200m
#
You may have to uncomment following on errors
#php_value
max_execution_time -1
#php_value
max_input_time -1
#
Uncomment following if you need to specify a mysql socket
#php_value
mysql.default_socket "path/to/mysql/unix/socket"
#!!
Mandatory !! : set magic_quotes_gpc to off (to make ocsreports works
correctly)
php_flag
magic_quotes_gpc off
#
Duplicate for php7 compatibility
AddType
application/x-httpd-php .php
php_flag
file_uploads on
#
Some PHP tuning for deployment feature up to 8 MB
#
post_max_size must be greater than upload_max_filesize
#
because of HTTP headers
php_value
post_max_size 200m
php_value
upload_max_filesize 200m
#
You may have to uncomment following on errors
#php_value
max_execution_time -1
#php_value
max_input_time -1
#
Uncomment following if you need to specify a mysql socket
#php_value
mysql.default_socket "path/to/mysql/unix/socket"
#!!
Mandatory !! : set magic_quotes_gpc to off (to make ocsreports works
correctly)
php_flag
magic_quotes_gpc off
|
1
2
3
4
5
6
7
8
9
10
11
12
13
14
15
16
|
#
Which version of mod_perl we are using
#
For mod_perl <= 1.999_21, replace 2 by 1 # For mod_perl > 1.999_21,
replace 2 by 2
PerlSetEnv OCS_MODPERL_VERSION 2
#
Master Database settings
#
Replace localhost by hostname or ip of MySQL server for WRITE
PerlSetEnv OCS_DB_HOST localhost
#
Replace 3306 by port where running MySQL server, generally 3306
PerlSetEnv
OCS_DB_PORT 3306
#
Name of database
PerlSetEnv
OCS_DB_NAME ocsweb
PerlSetEnv
OCS_DB_LOCAL ocsweb
#
User allowed to connect to database
PerlSetEnv
OCS_DB_USER ocsuser
#
Password for user
PerlSetVar
OCS_DB_PWD ocspassword
|
Activamos usuario root y nos loquemos como root.
sudo passwd root
su
Actualizamos nuestro Servidor
apt-get update
apt-get upgrade
Después instalamos los siguiente paquetes y dependencias necesarias
apt-get install wget build-essential apache2 php libapache2-mod-php7.2
php-gd libgd-dev unzip libapache2-mod-perl2 mysql-server libdbd-mysql-perl
php-mysql php-mbstring php7.2-mbstring php-gettext php-soap php7.2-curl
libxml-simple-perl libapache-dbi-perl libnet-ip-perl libsoap-lite-perl
Después este comando
cpan -i XML::Entities
Compress::Zlib Archive::Zip Mojolicious::Lite Switch Plack::Handler
Activamos el módulo mbstring en PHP
phpenmod mbstring
Cambiamos el password root del MySQL
mysql_secure_installation
Fájate en tu terminal, aparecerá lo siguiente:
Creamos la base de datos, el usuario y la password que
vamos a utilizar.
Para ello nos conectamos al MySQL con el usuario root
y el password que acabamos de definir. La base de datos se llamará ocsweb,
usuario ocsuser y password ocspassword
mysql -u root -p
Escribir línea por línea
Ahora actualizamos los privilegios
GRANT ALL PRIVILEGES ON
`ocsweb` .* TO 'ocsuser'@'localhost' IDENTIFIED BY 'ocspassword' WITH GRANT
OPTION;
Para salir de mysql ejecutamos “quit”
quit
El siguiente paso es instalar el OCSInventory.
Nos situamos en el directorio tmp y descargamos el OCS
cd /tmp
wget
https://github.com/OCSInventory-NG/OCSInventory-ocsreports/releases/download/2.5/OCSNG_UNIX_SERVER_2.5.tar.gz
“El anterior enlace puede ser
diferente dependiendo de la version actual disponible para instalar. Podemos
descargar la ultima version desde la web de OCS Inventory.”
Ahora lo extraemos
tar -zxvf
OCSNG_UNIX_SERVER_2.5.tar.gz
Nos situaos en el directorio de instalación y ejecutamos el Script sh
cd OCSNG_UNIX_SERVER_2.5/
./setup.sh
Durante la instalación dará el siguiente error: SOAP
(*** Warning: PERL module Apache2::SOAP is not installed !). No os preocupéis,
no afecta al correcto funcionamiento del OCS Inventory.
Ya tenemos OCS Inventory NG instalado en el servidor.
Creamos los siguientes enlaces:
El primero es para dar de alta la web de OCS
http://DireccioDeTuServer/ocsreports
El segundo es para dar de alta la dirección dónde se
recogen los inventarios
http://DireccioDeTuServer/ocsinventrory
ln -s
/etc/apache2/conf-available/ocsinventory-reports.conf /etc/apache2/sites-enabled/ocsinventory-reports.conf
ln -s
/etc/apache2/conf-available/z-ocsinventory-server.conf
/etc/apache2/sites-enabled/z-ocsinventory-server.conf
Reiniciamos el servidor Apache
service apache2 restart
Abrimos un
navegador e ingresamos la siguiente URL;
http://IP_DEL_SERVIDOR/ocsreports
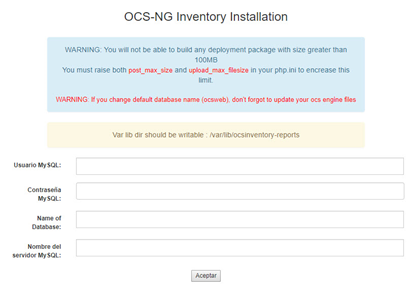
La advertencia que nos aparece es respecto al límite
de 100Mb. Lo podemos ampliar si es necesario editando el siguiente fichero.
nano /etc/apache2/conf-available/ocsinventory-reports.conf
Buscamos y modificamos las líneas a 200Mb
Guardamos los cambios; ctrl+o y ctrl+x para salir.
Para eliminar la segunda advertencia de escritura en
la carpeta, usamos el siguiente comando:
chown
www-data:www-data -R /var/lib/ocsinventory-reports
Para finalizar la instalación escribimos los datos de
la base datos creada anteriormente;
Usuario: ocsuser
Contraseña: ocspassword
Nombre BBDD: ocsweb
Servidor: localhost

Hacemos clic en “enter OCS-NG
GUI”

Ahora
en Perform the update

Accedemos con las credenciales de usuario admin
y contraseña admin

El siguiente paso es eliminar el fichero install.php.
Bastaría con renombrarlo.

mv /usr/share/ocsinventory-reports/ocsreports/install.php
/usr/share/ocsinventory-reports/ocsreports/install.php_old
Modificamos el fichero de configuración z-ocsinventory-server.conf
para que los inventarios puedan subir a la base de datos.
Aquí metemos los datos de nuestra base de datos creada
anteriormente
/etc/apache2/conf-available/z-ocsinventory-server.conf
Reiniciamos servidor apache
service apache2 restart
Instalación del Agente para
volcar el inventario del equipo en el OCS.
Desde la web de OCS podemos descargar los diferentes
agentes actualizados, en este caso instalaremos el 2.4.0.
Web de descarga del agente: https://www.ocsinventory-ng.org/en/


Ahora podemos ver en nuestro servidor
OCS que el equipo ya ha reportado correctamente.

Instalación desatendida
Creamos un fichero script .bat en
la carpeta del instalador con los parámetros de configuración del servidor. Al
ejecutarlo tendrá la misma función que la instalación manual. También podemos crear
una política GPO en nuestro Dominio y inventariar todos los equipos.
NOMBRE_SETUP_OCS.exe
/SERVER=http://IP_DEL_SERVIDOR/ocsinventory /TAG=PruebaOCS /NOW /S /NO_SYSTRAY
Wiki: https://wiki.ocsinventory-ng.org/


me ha ido genial, gracias! muy bien explicado
ResponderEliminarhola me ayudo mucho tu tutoria pero no se como instalar el agente en windows mediante un GPO
ResponderEliminar